Wednesday, November 10, 2010

Progress on one of my favorite makeovers!

If you remember I showed you this house about a year ago.  http://sunshinesdesign.blogspot.com/2009/02/built-in-1977.html
Well since then I got hooked up with the owners of the house(who are great by the way!) and I am helping them re-do the house! 
Slowly but surely it is coming along! 
They have five kids, a chiropractic business and some farm animals to take care of!  As if thats not enough they are trying to renivate this beautiful house.
So you see what I mean about the slowly but surely part!
They have done all of the work themselves! I have just given my suggestions.

                          I am really excited about this makeover!  Here is the progress on it so far!

If you remember the stairs used to look like this!


Now they look like this!
We added some molding under the chair rail, tore off the decals on the sides of the stairs, filled in where the decals were, painted everything white, and tore out all the carpet. 
Next there will be new caps on the stairs that will be stained brown. 
The railing will also be stained the same brown.


They tore out the old hard wood because the wanted throughout
 the house and it was too hard to match it up to the old stuff.  It was previously just in the entry. 
I think what they picked out is beautiful!

This is the color that we are painting the entry. 
It is Plantation Beige from Kwal.

Here is a picture of the molding that we added in the Dining Room.
That sponge painting just has to go!

Here it is after painting! 
 Isn't such a difference already!


Here it is after! 
Do you not love the red?!  It is Robust Red also from Kwal.
I think it looks Great! 
Did you know red makes you want to eat more? 
No better color for a Dining Room!


These are the cabinets in the Dining Room! 
Pretty Green, but just not what we were going for!

Here they are during painting!


Here they are all hung up! 
BeAuTiFuL
Don't ya just love that floor?

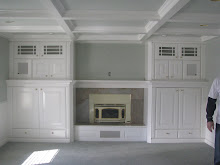
They painted the coffered ceiling in the family room all white. 
They were a grayish color before. 
Since the ceiling aren't super high we wanted to lift up the ceiling!
I think it did the job!


We choose Handsome Blue for the walls.
I think it goes great with the slate on the fireplace
and also the accents of blue in the rug!

My client loves garage sales and shopping on KSL (Utahs form of Craiglist). 
She picked up this bench for FREE! 
Can you believe it?
The seat on the bench is just a little warped,
so they are cutting a new seat out and restaining it!
Stay Tuned to see the bench transformation and where they put it!

Sunday, October 31, 2010

Kitchens

I am loving these kitchens!  We are in the process of trying to buy a short sale and the kitchen needs totally Re-DoNe!  Here are some of my DREAM ideas for a new kitchen!
(If I have used any photos from your websites please let me know.
I have forgotten where I have got these from.)


Monday, October 4, 2010

Fun Living Re-Do

My Great Sis-in-Law refered her fun neighbor to me! 
She wanted to start with her Living Room and it was such a fun project!
She wanted to go with some fun colors, so I had her pick out a fun rug to base the project around. 
She choose the cutest rug with some great colors in it that worked great in her house.
Together we went and picked out things that we thought would look cute in the room!
And then I placed them for her!

BEFORE:

AFTER:


BEFORE:

AFTER:


BEFORE:


AFTER:


This chair was to die for! 
The brown with the cream damask pattern tied in just lovely! 
And the Pillow! 
How cute is that!


She had this clock for 3 years and just wasn't sure where to put it! 
Well we found the perfect spot!


It was a fun project with a fun client! 
We did some in the Family Room also!
I will be posting some of that tomorrow!

And soon to come is another great Makeover that I am thrilled about!
There is lots of fun progress on it! 
I will be posting it soon!

Friday, September 24, 2010

A Cute room for a Cute Girl!

One of my clients wants me to add a few little touches to her 3 girl's rooms.  We started off Miss K's room first. 
For just over $100 we made this room fit for a little princess!
They already had great furniture and a cute bedspread, so we just added a few accessories! 


BEFORE:
Here is how the room started off.
Not too bad but just a little plain.

AFTER:
So what we did was added some poka dot pillows to the bed,
some cute pictures to the wall with little shelves under them to give them some weight,
a cute butterfly in the corner to give the room some whimsy,
and a white curtain rod and cute lavendar curtains with polka-dot ribbon. 
We are next going to add a big magnet board for her to put all of her art, pictures, etc.

BEFORE:

AFTER:

 I Loved this Lamp! 
It can go from little girl, to pre-teen, to teen!


The trim on the curtains matches the cute
 polka dot rug at the end of her bed and the pillows on her bed!

When you are doing a room just try to coordinate things. 
 I took the lavendar out of the bedspread and decided to use that as my main accent color.
Then I found things with polka dots and decided to go from there. 
We did this room for like $130. 
Not too shabby! 
Good Luck with your up coming projects!

Saturday, September 18, 2010

Polka Dot Rug

I just got a new rug for Avery's Room and I love it!
It matches her room perfect and best of all it was a great deal!
It is a Pottery Barn Rug, 5x7, that is usually around
$300 and I got it for $75!


Thursday, September 9, 2010

Happy Fall Ya'll

I was feeling a little ambitious today and
thought I would tackle a little porch project!
I am trying to keep my projects under
budget so this was done pretty cheap!
So here it goes...

I started off with 3 pumpkins of descending sizes, spray painted cream, and a pot that I already had and spray painted black.

I broke off the stems of the bottom and middle pumpkin...

Drilled a 1/2" hole the top of the bottom pumpkin, the bottom and top of the middle pumpkin,
and the bottom of the top pumpkin


Set the pumpkin's in the pot.  Threaded the dowel through the pumpkin's...


Put some leaves in between them...
And the whole project cost:
-pumkins $5
    -Spray paint $4
-Pot free
-Leaves free

I got these cute mums for $1.22 a piece.
Total $3.66


This chair from kitchen broke a few days ago and was on the trailer to go to the dump. 
I saw it and thought that it would be cute on my porch with something on it. 
 I already had this pot of geraniums my mom got me for Mother's Day. 
I thought it looked cute!

My mom gave me this wreath a couple of years ago
and I had the burlap in my craft room.


Total Cost:  $12.66
Not too bad!
Related Posts with Thumbnails