Friday, February 27, 2009

Built in 1977

Isn't this house great! A little, ok a lot outdated, but such great bones! This is a house by me that is a short sale. I wanted to make an offer on it, but someone beat me to it! But, I did get to go inside and look at it and I feel in love. Not only with the house, but with the view! It is spectacular! So here is your tour of my dream house built in 1977.
EnJoY!

Entry

Kitchen

Formal dining room
(Beautiful ceiling and look at all the storage space!)


Office

Laundry Room/Bathroom/Mud Room

Family Room
(Don't you just love all the white molding and cabinetry)
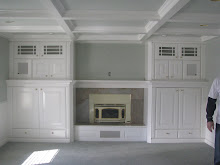
Check out these coffered ceiling! I am in love!

Aren't those cabinets great!

Master Bedroom
(If you look carefully you can see the great view!)

Fireplace in Master:
(Yes, that is fabric on the walls! Have fun taking that down!)

Second Bathroom upstairs
(Look at those great marble floors!)


Love the molding!


Second kitchen downstairs!


I have saved the best for last! This is the awesome view you would have from the back yard! Isn't it great! View is #1 to me and the house second. I would love to look at those beautiful mountains everyday! And no houses obstructing the view! So what do you think?!


Thursday, February 26, 2009

SpRiNg

It is finally starting to get a little warmer and I feel like my yard might have life once again! I got a little anxious and put up my spring display in my entry! What is even better is that I got all of this stuff for 80 percent off last summer! Always a good thing! I hope your all as excited as I am for one of the best times of the year!


Wednesday, February 25, 2009

Master Closet Re-Post

I joined Jen over at http://www.sanctuaryart.blogspot.com/ for her blog PaRtY. Here once again are my before and after shots of my master closet. Horrible, I know! But, I am real and I do have junk in my trunk! So here it is!
BEFORE:

AFTER:
These $1 containers work great for shoes. I have taken pic's of them all and will be putting them on the front of the boxes.

BEFORE:
AFTER:

This one is my FaVoRiTe! I put this hooks right into the wood that supports the shelf. It works great for necklaces! Then I got these fishing hook boxes at Wal-mart for $2.87. They work terrific for my rings and small earrings. The rest of my bigger earrings and some bracelets I put in a bead container on the shelf. I am loving it! I feel like I know where everything is! You could even go as far as labeling the boxes. I don't have enough (YET) so I did not feel that was necessary. Hope you like it and Happy Wednesday!


Tuesday, February 24, 2009

Organization in my mud room!

I'm I the only one who has a million papers on my counter top at the end of the day! Kids' homework, junk mail, magazines etc. I decided I needed one area to put everything. Some kind of station. I found one that I really loved on Pottery Barn's website, but let's get real people, who can afford that! And even if you could who wants to spen $1000 on a organizational station! Well not me! So here is what I came up with. It is in my mud room because my husband did not want it in the kitchen (my choice). So, this is what was here before, which I really love so I just moved it.
BEFORE:
AFTER:
There is pins boards, and magnetic boards, and off to the side on the other wall there is a stack bin for homework, mail, etc. I haven't had much time to use it, but I am hoping that it works out!


Monday, February 23, 2009

Cute Spring Skirt

Little Girl Spring/Summer skirt
I saw a skirt like this on www.pixiedustcouture.com ! I thought it was really cute. So I went to the material store and got this cute material! I have had it laying around for about a month and decided to sew it up today for my little girl! I thought it turned out really cute! And my daughter liked it too! You could wear it over a pair of jeans or by itself! Hope you like it!
Front:
Back:

Wednesday, February 18, 2009

Canvas Art Fun

First of all I'd like to show all of you the snow that fell yesterday where I am from. Can you believe it! The Mountains are covered! I love to look at those mountains from my porch. Aren't they beautiful?! It would be even better if there were no houses in that view wouldn't it?! But still I do love them! Now back to reality!

This is our latest project: Canvas Art! I am pretty picky about what goes in my kids' rooms. I wanted to let go of that a little and let them do something in their rooms that was just them. So I decided what better thing to do than to capture their cute little pictures they draw for me daily. So we headed off to the craft store and bought these 20x23 canvas'. I had them draw what they wanted to paint on a piece of paper before we began. Then we picked out the paint colors, put them a paper plate and they went to town! I supervised so that there wasn't a huge mess, but other than that I just let them do their thing. I think that this is one of the funnest things we have done together and the most special to me. They turned out just precious!

This is my daughter's canvas


This is my 3 year old son's

(We are still waiting on my 7 yr. old son's)

Friday, February 13, 2009

A custom lamp for a custom craft room!

I needed a lamp for my craft room because my lights in there at night are ridiculous. I make my jewelry a lot at night and it is really hard to see. So instead of buying one at the store I went, you guessed it, to the thrift store. I found this little beauty for $5. Look at the nice shiney chrome at the bottom of it! The only down side was the shade. Instead of buying a new one I thought that it would be fun to cover the old one to match my craft room. So this is what I did!
Supplies:

To make a cover the old shade I had to trace it on a poster board. You could also use news paper. You start at the seam on the shade.
Then you just roll it and trace. I used marker and as you can see it got on the lamp shade. Not so smart. I should have used a pencil, but learn as you go I guess!

This is the finished trace
Next you will want to cut it out and pin it onto your fabric.

All cut out!
Next, you want to use the spray adhesive and attatch the material. Start at the seam. This can be a little tricky, but not bad. It was easiest for me to hold it up like so and spray and then smooth. Make sure your material is going on right. You can adjust it a little bit as you go.

Spray:
Smooth:
Done smoothing:
Next you want to cover the seam with ribbon of your choice.
Make sure you cut it long enough to overlap
I put the ribbon on the top and some beaded fringe on the bottom, and there you have it!
A custom lamp for a custom craft room!


Thursday, February 12, 2009

Love of photography

My husband and I went to San Francisco last summer. I had never been there before, so it was a fun place to visit, especially for photographs. I love landscape & scenary pictures. So here are some of the pictures I took!

The famous Golden Gate Bridge:
Lombard Street (very cool!):These next few pictures were taken on the island were Alcatraz is! This is one of the main reasons for the vacation. I love history and really wanted to see this! These old building were fantastic!


This is just a street in San Fran, but if you notice in the background you can see Alcatraz!


We went to Monterey and on our way I saw this huge field of artichokes growing! I honestly never thought of how they grew and I thought this was pretty neat!

Sorry I can't remember the name of this stop, but this tree is around 150 years old! It just grew there all by itself on that rock!


Related Posts with Thumbnails